Virtual Machines supported in your VDC will be displayed under the Virtual Machines section of the VDC Manager control panel, which will also indicate how many Virtual Machines your VDC is currently supporting out of the maximum number able to be supported, ie: 4 of 5 Virtual Machines as in the following example.

Clicking on each Virtual Machine will display the VM parameters on the right hand side of the screen as well as provide access to controls for each VM. Virtual Machine related control actions include the ability to Start, Stop, and Delete the Virtual Machine as well as the change the DVD/CD attached to the VM. The "Edit Virtual Machine" option allows you to change it's associated parameters such as Server Name, Administrative Group and allocated IP addresses as well as hardware related specifications of the VM including allocated memory, CPU and network card. Any upgrading or downgrading of hardware resources allocated to a Virtual Machine can be carried out within minutes requiring only a few clicks of the mouse and a simple stop and restart of the Virtual Machine.

Start Server
When a Virtual Machine is first created it will initially be in the powered down state. In order to power up the server you would select "Start Server" in the server controls menu for the VM. You will be prompted to confirm this action. Once the server has started up additional controls will appear in the menu allowing you to Reset, Shutdown and Stop the server as well as open the VNC console.
Reset Server
The Reset Server control is equivalent to pressing the "reset" button on a physical server and will cause the VM to reset and reboot. This action is usually taken when a server is unresponsive or inaccessible via normal means such as telnet/ssh or not responding when accessed by the VNC console due possibly to an overload or other similar situation. This type of server reset/reboot is considered a "hard" reboot and in some cases may result in data loss or file system corruption so if possible a "soft" reboot using either the "shutdown" or equivalent command or action on the server itself or the Shutdown Server control would be the preferred method of rebooting both regular dedicated servers and Virtual Machines supported in the VDC.
Shutdown Server
The Shutdown Server control is intended to perform an "orderly shutdown" of a Virtual Machine in a similar manner as the "Start -> Shutdown" action on Windows based servers or variants of the "shutdown" commands used for Unix servers. Using the Shutdown Server control will send a shutdown signal to the server which in most cases will result in the operating system executing an orderly shutdown or power down of the server.
Stop Server
The Stop Server control is equivalent to pressing the power off button on a regular physical server machine. This will cause the VM to immediately power off without an orderly shutdown. As with the Reset Server control this action is considered as being "hard" shutdown and in some cases may result in data loss or file system corruption so if possible a "soft" reboot using either the "shutdown" or equivalent command or action on the server itself or the Shutdown Server control is the preferred method of rebooting both regular dedicated servers and Virtual Machines supported in the VDC.
Open The VNC Console
The VNC console is a remote access method which provides the ability to manage a server as if you were physically sitting right in front of it at the data center. This method of access is similar to traditional KVM or IPMI access to dedicated servers and is normally used for operating system installs and other situations where access the server over the network is not available. As with KVM and IPMI access you can use your keyboard and mouse to interact with and manage the server as if you were physically sitting right next to it.
Change DVD/CD
This option will allow you to change the DVD or CD-ROM attached to the VM or eject any existing DVD/CD. Selection of the Change DVD/CD option in the server controls menu for a VM will display a dialog box which will allow you to select from the DVD/CD images available to your VDC or otherwise eject the DVD/CD associated with the VM.
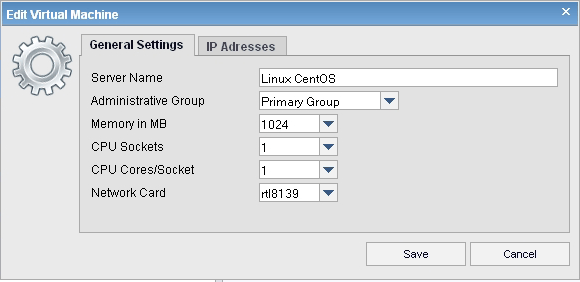
Edit Virtual Machine
The "Edit Virtual Machine" option allows you to change various parameters of a VM including such things as Server Name, Administrative Group and allocated IP addresses as well as hardware related specifications of the VM including allocated memory, CPU and network card. Any upgrading or downgrading of hardware resources allocated to a Virtual Machine can be carried out within minutes requiring only a few clicks of the mouse and a simple stop and restart of the Virtual Machine.
Allocating IP Numbers
In order to allocate additional IP addresses to a VM you first need to allocate the IP address(es) to the Administrative Group associated with the VM from the pool of IP numbers allocated to your VDC. This is done by by selecting the group associated with the VM under the Administrative Groups section of the control panel and then selecting the "Edit Group" option for the selected group.
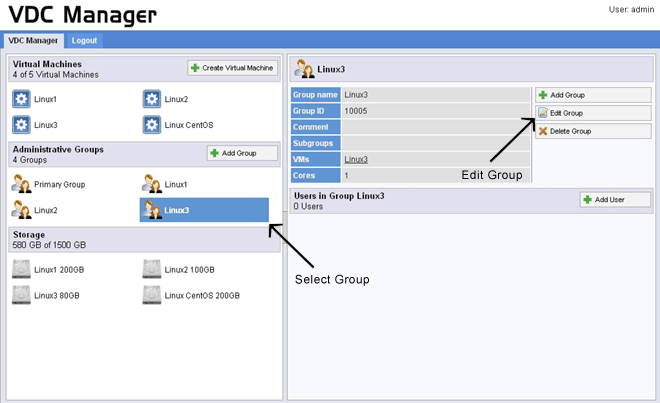
Under the "IP Addresses" tab in the Edit Group dialog box you will see a list of the IP addresses allocated to your VDC in the left band column and you can select the IP address or addresses to be allocated to the group and click on the arrow button to assign the addresses to the selected group. Similarly, if you need to remove an IP address or addresses from a group you would select these in the right hand column and click on the arrow to send them back to the allocated IP pool for your VDC.

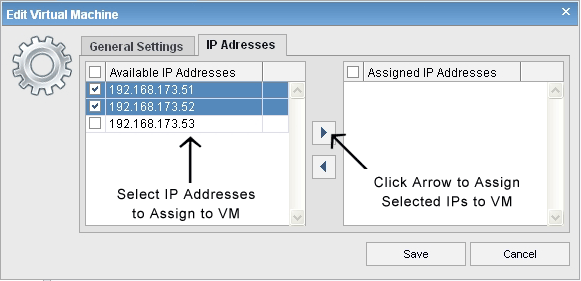
Once additional IP address resources have been allocated to an Administrative Group these can be used for any Virtual Machine which this group has under it's management. This would be done by selecting the VM in the Virtual Machines section of the control panel and choosing "Edit Virtual Machine". Under the IP addresses tab in the Edit Virtual Machine dialog box the Available IP Addresses will be displayed in the left hand side column and can be selected and assigned to the VM by clicking on the arrow button and selecting "Save" afterwards to complete the assignment
 Managing VDC Users
